I’ll start with a picture of a beautiful 1966 Aston Martin DB6. One of Newport Pagnell’s most beautiful cars. This one is a Superleggero or in other words “mostly aluminum bodywork” . The car spent most of it’s life in or near Monterrey , Mexico.
Click on pic to enlarge, arrow back to text….
The new owner bought the car from a reputable outfit near Scottsdale, AZ.
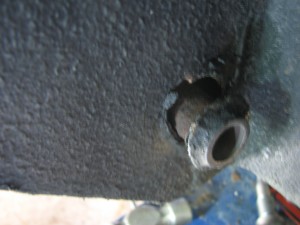
While driving here in Albuquerque, upon applying the brakes at a stop sign the right rear wheel fell off and caused some ugly damage to the rear quarter panel. Apparently some nitwit had installed the splined knockoff hubs on the wrong sides. So rather than self tightening, they were self loosening.. Exchanging the (presumably) removable hubs in the end required swapping the entire axles since the tapered and keyed axle spines would not let go of the directional hubs. This was a fiasco in and of itself as the brake caliper brackets were trapped between the hub and the axle bearing casting and when reversed to the opposite side the also trapped fastening bolts were no longer matching in correct lengths to reattach. A hack saw took care of that but in the process of doing this job I noted to the owner that the rubber bushings in the solid rear axles 4 link attachment to the chassis were all badly worn and that one of the lower links attachment “tube” was completely adrift from the chassis. No doubt the loud clunk we heard from the rear of the car. See picture.
Both of the lower tubes had been (poorly) welded with brass. I have to assume that the car was hit in the rear or spun backwards into an immovable object and necessitated the re-welds. Brass being typical of a poor Mexican repair.
This repair required removing all traces of the brass from the tube and the chassis box. Difficult as the tube was half in the chassis and access was limited. I used ~ 3/16″ thick hardened steel kingpin shims to reattach the tube on the right side. The left side was still sound so I decided to leave well enough alone, but the previous repair left that carrier at a less than perfectly horizontal angle.
With that accomplished I moved on to the 3 remaining pivot bolts that were rusted solid in their receivers that carried the other bushings.
Each of the three required a full day of drilling and removing the bolts with rotary burrs and all the while not disturbing the carrier tube they passed through!
I had my favorite machine shop make new pins and we also made the lower links adjustable to account for the non horizontal position of the one remaining lower pick up and to allow for a little pre-load on the pinion angle to reduce rear end squat and squaring the rear axle with the front wheels.
The original factory rubber bushings were replaced with black Delrin, a permanently self lubricated plastic product that can be machined. We also made Delrin washers to limit thrust movement of the bushings.
While this was happening I had shipped the Aston Martin’s “selectimatic” Armstrong lever shocks to my friend Peter Caldwell’s World Wide Automotive in WI for overhaul, as they were leaking badly and would no longer operate from the dash control knob.
All in all a pretty intensive project, but one that had to be done to keep the car on the road and once you’ve experienced one of James, …. James Bond’s cars there is no other conclusion.
Next project is to renew the Watt’s linkage bushings with Delrin… Hope it’s easier than the last!
dp


No comments yet.