Dolling up an XK 150 S Jaguar

Posted on January 1st, 2012 by Dave under Austin Healey, auto restoration.
Tags:

I’d have to say that Jag XK’s are right near the top of my favorite old sports cars from the UK. Probably a XK140 roadster would top that list just because they look the best to me, however for sheer brute strength it would be the XK150 S.

The 150 S had three 2″ HD8 SU carbs on long individual intake manifolds and the 9:1 high compression hemi- head. Some were 3.4 Liter displacement and some were 3.8L All had 4 wheel disc brakes, a first for Jaguar cars.

Here is a bevy of XK 150’s in front of my shop, the red ‘S’ roadster, a black 150 ‘drop-head’ or convertible in US parlance, and a white ‘fixed head’ or coupe if you like.

Customers Jags-3 XK150’s on the same day!

(  Click once or twice on pixs to enlarge)

The black DHC is one I am just finishing up a multi-year restoration on. Perhaps I’ll finish documenting  it in the future. Today’s entry however regards the red roadster and its mechanical ills.

The car presented with a lack of power and a lot (!) of valve tappet racket. These engines are of twin overhead cam shafts which act directly on the valve stems with an inverted bucket, the lash (valve clearance) adjusted via variable thickness shims or discs between the bucket and valve stem.

Visual inspection after removing the cam cover (exhaust side-where the noise was) showed nothing and compression reading were within normal expected at cranking speed. Now, its not too uncommon for the exhaust side to have the sleeve that the buckets reside within to move from their factory interference fit depth setting.  Clever aftermarket plates are sold to sit on the vertical exposed face of the sleeves to hold them stationary in the head. So, I ordered a kit and installed it, but it made no difference in the racket. Sigh.

Bucket sleeve hold down plates

The picture above is after the head was removed. Since the hold downs didn’t fix the problem, I informed the owner that the head would have to be removed to see what was going on. I ought to buy a boroscope , but even then the head still has to be pulled to repair it. These triple carb cars require quite a bit more time to take apart as the inner engine compartment panels have to be removed and the fuel system piping and filters are a nightmare.. Try counting all the nuts that were removed, polished and replaced!

Well to make a long story short, the offending cylinder/valve was a wallowed out valve guide and do I mean wallowed out. Here’s a picture. Compare the guide diameters..

The guide in the middle is nearly half again the size of the adjacent guides.

As it turned out all the exhaust seats, guides and valves were replaced. I also installed new intake guides and 2 intake valves, did a 3 angle valve job and resurfaced the head. might as well do it right when its apart.

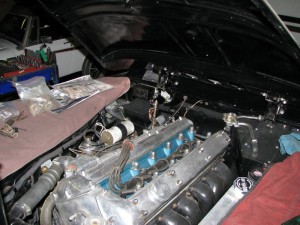
From the picture below its also clear to see that the cosmetic condition was rough and the customer requested that the entire engine compartment be detailed as best as possible with out removing the engine and other major assemblies.

A rough idea of the “before” picture

As you can see there was a lot of corrosion/oxidation on all the aluminum and the paint was badly degraded and the block was painted a GM orange at some point in the cars past. UGH!

So the customer wanted everything polished and painted..which meant dis-assembly and rebuild of the carbs and manifolds…

One of the big SU’s and the aux. cold start “carb” and piping.

After nearly a full day of standing in front of the polishing wheel, here are some of the finished bits..

Still have the carburetors to polish..

here’s the area prepped for repainting parts of the firewall and radiator surround..

Takes longer to mask than to squirt some paint…

And finally here is what it looks like now…

More than a couple hours of work..believe me!

So after restoring the air filter assembly and painting the under side of the hood (bonnet) it was looking damn nice and needless to say the car ran like a scalded cat.

Cost? More than the customer wanted to hear, but it was what he’d asked for and he did get some frequent flyer points from his credit card company.. :~)

Dave

Comments (0)

Jaguar XK150 Drophead project

Posted on December 3rd, 2011 by Dave under Austin Healey, auto restoration.

I’m going to attempt to semi- document the restoration of an old Jag.

Click once or twice on photos for close ups. Use back arrow to return to text.

My customer bought it in 2006 thinking it would be a pretty easy job, well, no. Here’s a picture or two of the original condition.

Engine compartment

Multi layer rotted top-dried out leather interior

Body on the way to media blaster

Engine and gearbox out

Restored chassis

Rebuilt head

Previous brass welding repairs

The rear half of the car had sustained a lot of damage and was poorly repaired and heat distorted from all the welding, so the entire body was cut in half behind the driver’s seat.

New rear clip

The new rear was fabricated down in Chula Vista, CA by new found friend Jorge. More on Jorge later. The fenders are still missing as one was a terrible fit. The original rear end en toto was shipped to Jorge so he had a good “pattern” to work with. Apparently there were differences with the FHC, the Roadster, and the Drophead.

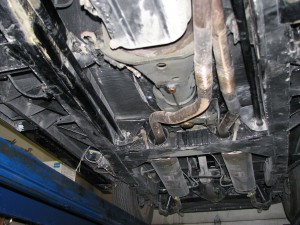
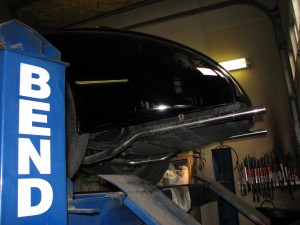
Underpinnings

Underpinnings

A shot of the dirty, from the body shop dust and wet sanding, of the new dual exhaust and the missing automatic transmission, which was replaced with a Jag manual and Laycock Overdrive.

new rear end and fenders

Before

After

Engine compartment

As you can see the car is now black..  I installed the engine and running gear after painting the engine compartment beforehand. Some of the new harness was also installed, so the painter could easily move the car under it’s own power. The compartment was also pre-painted so the painter could simply mask off the entire area and not over spray everything in sight. I’m currently working in the corner installing more harness and fuse block bits.

OK the corner or correctly the fuse block, wiring strip connector, voltage regulator, and cover (sans the hold down stud and nut) are installed. For some reason the fuse block won’t sit flush on the one rear/right corner. I looked at the original (before dismantling) pictures and there was no fastener there then either.  Odd..I think. I’ll spend some time there when I get back to doing the “details”, right now I’ll push on with the front half of the cars electricals.

XK150 engine compartment nearly complete

In this next shot the headlight buckets and adjusters and all are installed. The re-chromer’s shop still has the bezels and a whole pile of other stuff.

Lighting almost done in front..

Backside of the instrument panel

Well, this should be fun… There are still about 9 pieces of the full wiring harness to install.

Got it whittled down a bit today. Only 5 sub harness bits left to go.. here’s with a flash and without a flash..

dash wired and functional

in the dark...

It’s been about a week and as the chrome parts are trickling back from the plater  (Triple Plate in WA.) I’m getting the lights all installed and wired and functional.

The rear boot lid was a real problem to both fit and make the latch and lock work again.

boot lid and chrome bits

and here’s the front. In both photos the bumpers are not fully attached, if you’re curious about the angle…

front end, chrome and lamps

Rear end of the 150 all done…except for the interior of the boot..

finished rear end chrome and lights

The steering wheel was a mess. They, I believe, were originally enameled completely. the hub, the spokes and the rim. I don’t mean paint enamel either, its the hard baked ceramic like finish. Well, this one was totally devoid of the original enamel. After soda blasting the paint off there was nothing but the most porous metallic surface I’ve ever seen. I tried to paint it with straight black Imron, but the thousands of tiny holes just caused an air bubble mess. So, it was blasted clean again and sent to a powder coater, who after two coats made a nice job of it. The old rim wrap is back on to protect it while the car is at the upholstery shop. The Bakelite  ring around the horn ring really looks better than the camera flash makes it appear.

Adjustable steering wheel assembly

This next one was a bit of a challenge. The grille originally had a lip of some sort cast into the bottom inside edge that acted as a safety catch should the main latch fail. No one wants a bonnet bent over the windshield.  Anyway, there was no easy way to weld anything to the newly chromed grill.. note (do this stuff before sending to re-chromer) so I had to fab a catch. Using 5/16” tubing I cut and brazed together a hanging loop from about the grill’s midpoint, where it had a drill-able spot on the bonnet. Then it drops down in a smooth V like  shape and catches the latch on the pan behind the grill… Pretty neat and it barely shows..

Safety catch

The next day or two will be used to install some noise deadening blanket material. Then the customer has a remote located radio, requiring an inverter for the positive ground nature of the car and lastly the speakers which also need to be hidden some where in the vicinity of the two rear jump seats..

The side glass and vent wings and chrome is in. New fuzzy velcro in the guide channel. The amp and inverter for the hidden “Secret Radio” is installed.  See it?

interior shot

Set back…

Cracked glass.... Not acceptable

The project leaves tomorrow for the upholstery shop. I’m planning on driving it the several miles there. Need some cushions to sit on and someone to run interference as the seat belts aren’t exactly installed yet..

Well the car has been at the upholstery shop for a couple months now. Mostly it’s been a fight to rebend and fit the wood pieces that were badly warped.. the new stuff fits worse in many cases… here where it is today..

dash is done

more required on the top..

Stay tuned..much more to come……

The project car recently returned from the “top shop” a couple weeks ago. They have completed most of the work, but the trunk (boot) is still unfinished and two side kick panels in the cockpit are needing panels to be made. We are unhappy with the fit of the top at the windshield header, but I’ve come up with a simple solution I hope.
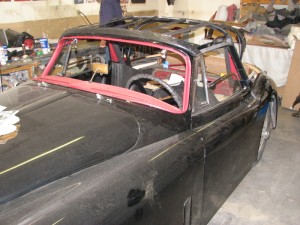
Here are pictures of the interior so far.

Leather and Wilton wool

nearly done

Click on this one!!!

The new wheels and tires are on and the front end aligned and new rear springs have it going down the road indescribably well.

As soon as the remaining upholstery work is complete, it will go back to the paint shop for flaw and incidental flaw repair and final buff out. Then, my friends, I’m afraid I will have to turn it over to the rightful owner. A dark day indeed..for me…

Comments (1)

A new old suspension

Posted on November 29th, 2008 by admin under Austin Healey, auto restoration.

Click pictures to enlarge
Here is a project that I have been seriously dragging my feet on. It’s a pretty loosely done replica of a Bugatti Type 35 Grand Prix car. The radiator, steering wheel and gas tank are authentic. As are the Marchal headlights (not shown). It was done with a Triumph Spitfire front suspension.

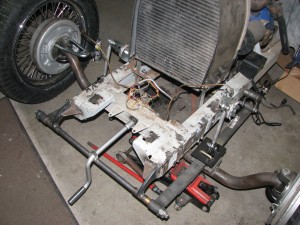
In this picture the coil over shocks, double A-arms and rack and pinion steering and the disc brakes have been removed. It was pretty hideous and the 13 inch wheels really looked out of place. I will say that it did work pretty well, though in typical Spitfire tradition it turned too far at full lock and just pushed down the road.

The owner asked “can you make it look a bit more like the original car?”

Well, silly me, how hard can that be? As it turns out, a lot!

I’ll jump ahead about 12 months and here it is as of now.

Here I’ve installed a 6 inch drop Ford axle. The hubs are also Ford, but they are upside down so I ended up with a manageable 4 degrees of positive camber. The originals had a ton more, but this at least looks right and won’t tear up the tires too fast (I hope) The parallel leafs are 26 inch hot rod springs with nearly all the arch removed. I added rear shackles from a MK 7 Jaguar. Originally the longest leaf just slid through a slotted receiver. I think there was less than a 1/2″ of spring flex. I think the only suspension was tire pressure!

The brakes are from an Austin Healey 100. That took a bit of machining! The wheels are MG TC wires and the tires are replicas from Coker Tire. This was the first screw up. I never considered the lack of offset in the wheels to accept the drum brakes. So track is wider than the rear axle. We can get some correct wheels made at a later date.

Here is some more hot rod stuff. Friction shocks. I’ll do some final shaping of the axle cap and other rough stage installations after it looks like it will all work.

This has been the most frustrating part. The steering gearbox. It must exit the engine cowling on the right side and connect to the steering arm at hub with a drag link off a Pittman arm. After scouring the world via Internet (as some of you know) I found a Volkswagen box that when rotated 90 degrees seems to fit the bill. A custom Pittman arm will have to be made. The connection from the steering column to the gear box was done with a couple bicycle cogs and some chain! The column now floats since it doesn’t terminate at the rack anymore. So I need to address that so it doesn’t derail the chain. Engineering at it’s finest…

I’ll measure up some numbers for the tie rod and drag link next week.

here’s the look I’m trying to achieve within reason and cost constraints..

Well, I got a bit side tracked with the track tandem bicycle project, sorry.

I have progressed a bit more towards making this project steer. I’m waiting for my machinist to produce a collar for the VW steering box to which I’ll attach the custom Pittman arm (also in the machinists hands).

I’ve got the tie rod arms and the steering arms attached to the hubs and the faux hand crank installed.

Here I have fabricated a chain guide between the column gear and the steering gear box input. I’ve also made retaining collars with roll pins through the column at the distal support. Would not want that chain to fall off at speed!

need more sheet metal

need more sheet metal

Now just need to make some more sheet metal panels  to cover the bare chassis and connect new brake lines.

new sheet metal

Finally getting pretty close. The brakes and brake lines are installed and functional. The original like spring clamps are installed. Only thing lacking now is the Pittman arm and the two connecting rods to make it all work.  Should know next week if the work was successful.

Hooray!  The car made it’s debut on the mean streets of Albuquerque yesterday. I must say that I’m pleased with the overall results. As expected, there isn’t much compliance in the suspension, but it goes straight and turns on demand. Seems to be about the right amount of caster to give the very light front end some “feel”.

project 1-15-09

The fenders are mounted such that they now turn with the wheels. Need some new leather straps for the hood and still have to mount the Marscal headlamps somehow. The rear fenders also need to be moved so they fit the new 19 inch wheels. The brake master is bleeding by and makes for a very nervous test driver.  I’ll rebuild it tomorrow and venture a little farther away from home base.

project2 1-15-09

eds-buggatti

I came across this picture, in the bowels of my computer, of the original configuration of the car. I must say the new version is a lot  more original in appearance.

The good news is that the owner was by today and was thoroughly pleased with the results to date. I’ll try to post a last photo or two after the lights are installed and the final dressing up is finished.

Here are the last pictures of the “Buggatti”  It still needs the leather hood straps, but the owner will take care of that. Hope you enjoyed following along.

finished replica

img_1086

Time for a drive!

Time for a drive!

Comments (0)